UNpkl EasyMesh
Extend Wi‑Fi coverage across your home or office with UNpkl **EasyMesh**—one shared network name, secure mesh backhaul, and automatic routing to the main gateway (**controller**).
Tip
UNpkl devices ship as controllers by default. A mesh package of three may arrive with two agents and one controller already configured—skip agent pairing for those units.
Overview
EasyMesh is relevant when you add UNpkl Wi‑Fi access points that should work as agents (mesh extenders) under a single controller gateway.
In plain terms, an EasyMesh agent is a Wi‑Fi extender with stronger security than a typical repeater: agents discover the controller automatically, use encrypted backhaul links, and inherit Wi‑Fi settings from the controller once paired.
Typical layout:
- Controller — the UNpkl gateway connected to your ISP (WAN). It runs policy, DHCP, and cloud sync.
- Agent(s) — ceiling‑mount or PoE access points that extend coverage. Clients roam between controller and agents on the same SSIDs.
Common sizes:
- 1 controller + 1 agent
- 1 controller + 2 agents (common retail mesh package)
- 1 controller + 3 or more agents for larger floors
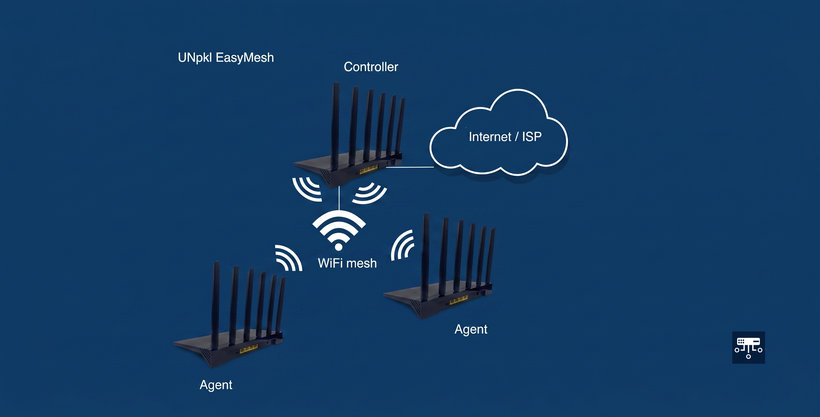
Enterprise deployments often use a UNpkl Gateway controller, a PoE switch, and multiple AP103 (or compatible) ceiling agents—see UNpkl SaaS for that workflow.
Controller and agent roles
Every UNpkl unit can act as either:
- Controller — main router on your WAN link; owns the mesh and customer Wi‑Fi networks
- Agent — extends Wi‑Fi; connects to the controller over wired LAN or a private backhaul SSID
turn agent on sets the device role to agent and turns it into a wireless switch: it bridges client Wi‑Fi while the controller remains the gateway.
There are two ways to add an agent. Prefer Option 1 (wired LAN) when you can temporarily cable the units together—backhaul settings sync automatically. Use Option 2 when the agent must join over Wi‑Fi only (you copy the controller’s backhaul SSID and PSK onto the agent first).
UNpkl configures controllers at the factory with turn controller on, so you usually do not need to change the controller role yourself.
What you need
Buy two or more UNpkl Wi‑Fi access points when you want mesh coverage (one gateway plus at least one agent).
Access points are available from the UNpkl store or authorized retailers. For permanent wired backhaul to agents, use a PoE switch so power and data share one cable run to ceiling mounts.
You will need:
- The controller (gateway already on your WAN / ISP)
- The UNpkl mobile app or local web UI with Search
- For Option 1: an Ethernet cable between the agent’s LAN port and the controller’s LAN port (temporary for sync, or leave it for wired backhaul)
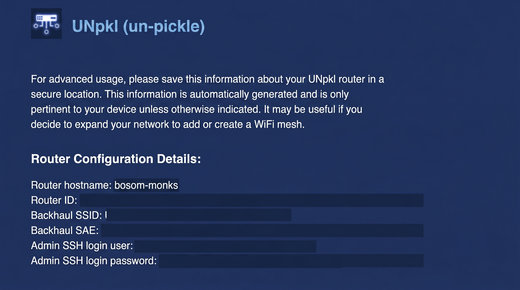
- For Option 2: the controller brochure and each agent brochure (factory backhaul SSID and PSK)
Set up the controller
- Complete Initial setup on the gateway that will be your controller (WAN, admin login, Wi‑Fi).
- Confirm it has internet access and that you can open Search on the app or web UI.
- Leave the device in controller role (factory default).
If you are unsure, open Live data → Topology after agents join—you should see the controller at the top of the mesh tree.
Set up an agent
Configure one agent at a time. UNpkl units ship as controllers; the steps below convert an extra unit into an agent under your main gateway.
Option 1 — Wired LAN (recommended)
Easiest path: convert the unit to an agent, then let the controller push backhaul settings over Ethernet.
- Connect your phone or laptop to the unit that will become the agent (not the main gateway). Join that unit’s Wi‑Fi or plug Ethernet into its LAN port, then open the UNpkl app.
- Open Search and run:
turn agent on
The device reboots and becomes an agent (wireless switch role).
- Connect an Ethernet cable from the agent’s LAN port to a LAN port on the controller.
After that link is up, backhaul settings sync automatically from the controller to the agent. You do not need to copy backhaul SSID or PSK by hand.
Leave the cable connected for wired backhaul, or unplug after sync if you want the agent to use Wi‑Fi backhaul later (confirm the agent still appears under the controller in Topology).
Important
After turn agent on, the unit cannot be switched back to a controller without advanced manual steps. Make sure you ran the command on the extra device, not on your main gateway.
Option 2 — Wireless backhaul (manual credentials)
Use this when you cannot cable the agent to the controller and must join over Wi‑Fi. Retarget the agent’s factory backhaul credentials to match the controller brochure, then enable the agent role.
#### Connect to the agent
- Connect your laptop or phone to the agent you are configuring—preferably over Ethernet to the agent’s LAN port. If you use Wi‑Fi, be sure you joined that agent’s network, not the controller’s.
- Sign in to the UNpkl app or web UI on the agent.
- Open Search.
#### Point the agent at the controller backhaul
From the agent’s Search box, run two commands (replace placeholders with values from the brochures):
change wifi setting ssid for <Current Backhaul SSID> to <Controller Backhaul SSID>change wifi setting psk for <Current Backhaul PSK> to <Controller Backhaul PSK>
Example (names will differ on your devices):
- Agent brochure might show Backhaul SSID:
UNpkl-AP-123456-1and Backhaul PSK:abcdefghijklmnop - Controller brochure shows Backhaul SSID:
UNpkl-AP-654321-1and Backhaul PSK:qrstuvwxyz123456
Use the agent’s current SSID as the for name in both commands, and paste the controller’s SSID and PSK as the to values.
#### Enable the agent role
In Search on the agent, run: turn agent on
The device reboots, joins the controller over Wi‑Fi backhaul, and imports Wi‑Fi settings from the controller. Repeat for each additional agent.
Important
After the next step the unit becomes an agent and cannot be switched back to a controller without advanced manual steps. Double‑check that backhaul SSID and PSK match the controller brochure, not the agent brochure.
Verify in the app
After agents come online:
- Connect to the controller network (or sign in to your cloud account).
- Open Live data → Topology.
- Confirm Controller at the root and Agent nodes linked below it, then client devices attached.
In UNpkl Cloud, the Live tab shows the same topology and connection charts for fleet deployments.
Placement tips
- Mount agents between the controller and areas with weak signal—not at the far edge of coverage.
- Prefer line of sight where possible; avoid metal racks, concrete pillars, and microwave ovens between nodes.
- For ceiling APs, center agents over the floor area they should serve.
- If clients stick to one node, move the agent closer to the dead zone or add another agent mid‑path.
See Troubleshooting if roaming is poor or an agent never appears in topology.
Mesh commands
Use Search on the controller or agent (while locally connected) for mesh role commands:
turn mesh onturn agent onturn controller onturn mesh controller on
Full phrase lists and SAC behavior are in Search & command.
Bulk agent setup
If you are onboarding many agents (for example a full office rollout), contact UNpkl support—we can provide scripts to automate backhaul retargeting and turn agent on instead of stepping through the UI for each unit.